Velocipede Temporary Closing Poster
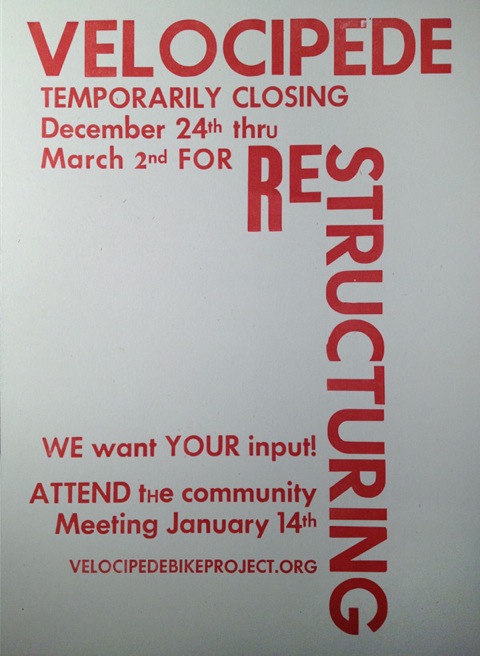
This poster represents several firsts. This was the first time I’ve used our wood type, combining it with type donated by some Velocipede Collective members (thanks!). It might also qualify as the first solely typographic piece I’ve printed. Finally, it’s the first time I’ve printed directly from a galley tray, a technique quite common in the press’ original usage.
The construction of the form improved my typesetting skills in regard to planning and problem solving. One difficulty proved to be the incompleteness of the fonts. I did my best to plan the distribution of upper and lower case so as to have enough of certain sorts (individual pieces of type), as well as stress important parts of the text. There are a few spots where I ran out and substituted other fonts, hopefully tastefully. As best I can determine, these fonts are all from the Futura family, or some variation thereof.
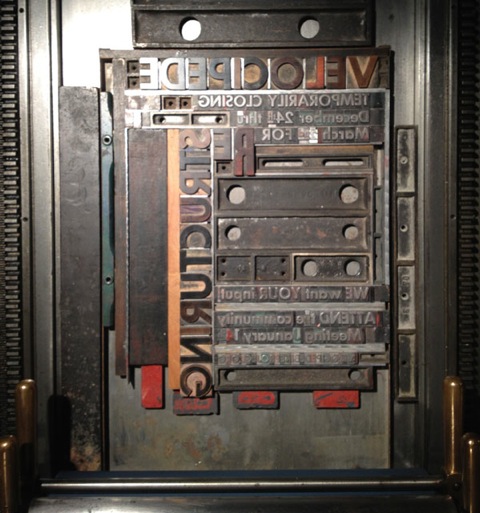
Lock-up was interesting and pretty easy. I locked the type into the galley tray, using magnets on one side, then just added furniture around the tray in the press bed until it was snug. In order to prevent any slipping of the form, the magnets were placed closest to the cylinder so that any force from printing would push the form against immovable furniture and not test the force of the magnets.
Because I was producing only 20 or so, it didn’t seem worthwhile to use the press’ inking system, requiring more cleanup as well as more time for makeready. Instead, I used a large brayer and a smaller one to ink areas where the large brayer would fall into the form. The less even inking seemed appropriate to the use of type that was itself uneven and, in some cases, physically damaged.
Read More...
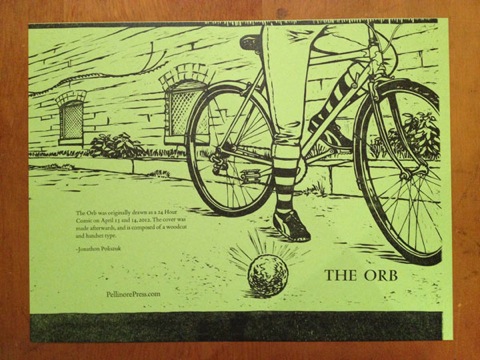
The Orb: 24 Hour Comic Cover
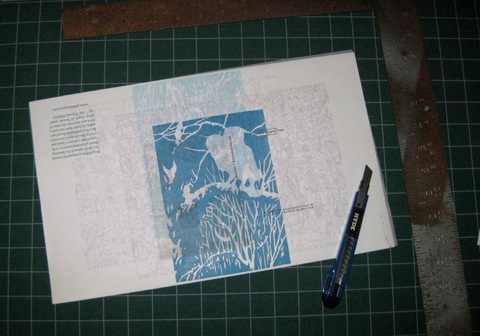
I’m going to start with a shot of the final type layout compared to a paste-up of the proof so it’s easier to envision the process. These show the covers trimmed and folded (it’s easier to see the fold on the white paste-up; it bisects the rear wheel). The type on the paste-up was printed as a group and then cut out and affixed to the proof to plan the composition. The typography on the green cover is nearly in its final position.

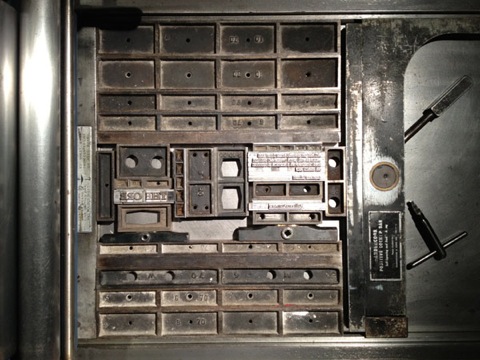
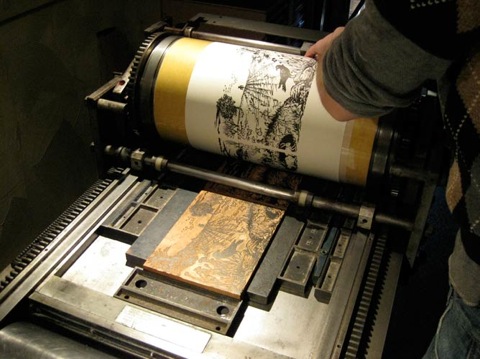
I neglected to take any shots of the woodcut being printed, so imagine that it has already occurred: a stack of covers awaits the second run for the type. Before removing the block from the press, I recorded measurements from the edges of the press bed to the approximate positions of the individual sections of type, based on my paste-up. I removed the block and all of the furniture, then placed the type sections according to the measurements I had taken. This shows the press bed, with the title on the left and the back cover text on the right. THE ORB is still secured with string in this picture.

From here, I added furniture to fill the space and quoins to lock the form. The press was inked and changes were made based on where the type actually printed. Eventually, the design was finalized and I focused on printing aesthetics. Here is the press bed as it appeared for printing. You may notice the lack of ink on the rollers and type. This is because, as usual, once I got involved in printing I forgot to take more shots and had to take one later, after the press was cleaned.
Here is the untrimmed cover. There are two unusual things about this sheet: it bleeds on two sides (left, bottom), and the right edge has a very small margin for grippers. The paper I wanted came in three sizes that would fit in our guillotine cutter, one of which was too small. The largest of the three was double the second size, which just meant more work trimming it down. The middle size left me a choice of easily getting one cover out of each sheet, with lots of waste/offcut, or being more precise and getting two. Obviously, I chose two. This meant squeezing the block as close to the grippers as possible and dealing with the bleeds. The bleeds weren’t a problem because the paper is thick enough that the areas of the block outside the paper were spaced away from the tympan enough so as not to print onto it.
This shot is a little washed out. The color and intensity is more accurately displayed in the first picture.
Read More...
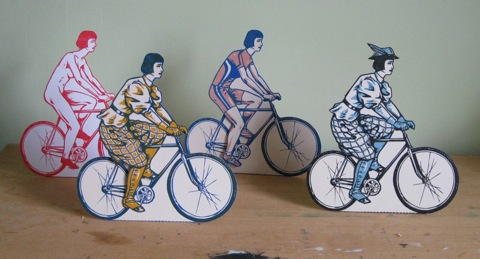
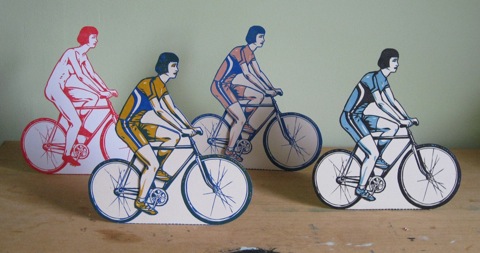
Cyclist Paper Doll Variations and Completion
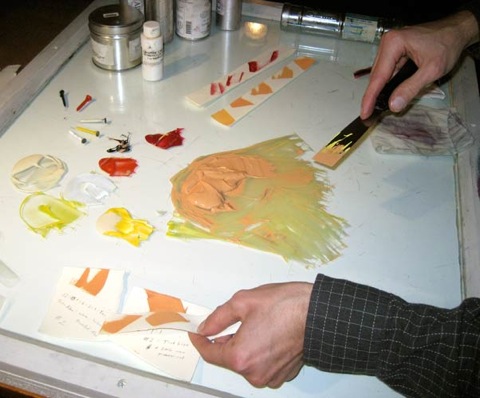
I tried two versions of the ochre, one of which was so unpleasant when paired with the blue that I won’t show it. The ochre below was the better one, but I was disconcerted with the dark green created when it layered with the blue. So, I tried a magenta with the blue (not shown, too horrible for sensitive viewers!) and a salmon. None of these were satisfying in all the costumes, and I finally conceded and tried black, an old standby, paired with a medium blue. This was much better overall, though I felt a little defeated by my lack of success with two real colors. Below are some of the variations. I will be listing the Cyclist on Etsy soon if you want to see detailed, cleaner shots of the final black and blue version.
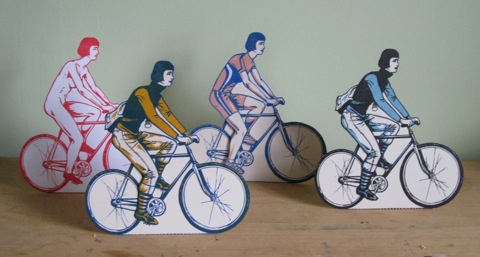
There are hats/helmets for each costume, but I only bothered to include the one for the bloomers in these shots, because it really completes it.
Read More...
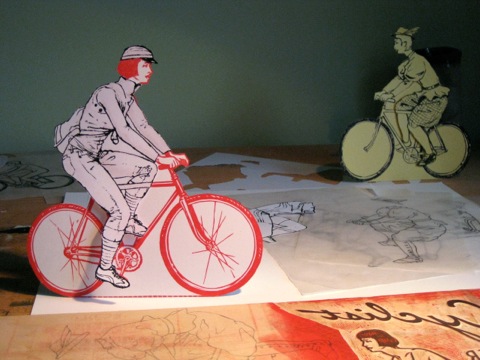
Cyclist Paper Doll
This time, with a different theme, I only did a few sketches of the cyclist and only drew a single test costume initially. I started drawing on the block earlier in the process, beginning with the cyclist on her bicycle. On the block, you can see the ink on the uncarved portion from the edge of the brayer. With the proof in hand, I used tracing paper to plan the costumes. This way, any slight changes that occurred from carving would be incorporated into the designs.

The computer was very helpful at this stage, allowing me to scan in the costumes, make the lines darker, and print multiple copies to cut out and experiment with. I then made any alterations on the tracing paper costumes directly because they could just be flipped over (pencil side down) and used like carbon paper to transfer the designs to the block. The resulting image would be backwards, as it should be on the block!
Here is a cut out proof wearing a computer printout “urban cyclist” costume. In the background is a prototype sketch wearing Bloomers from the 1890s. This red is definitely not one of the final colors!
Read More...
After Darwin: Intermediate Forms - TYPE!
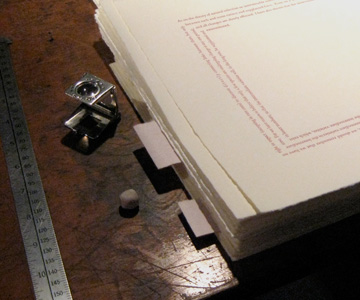
After Darwin #4 - Progress Photos
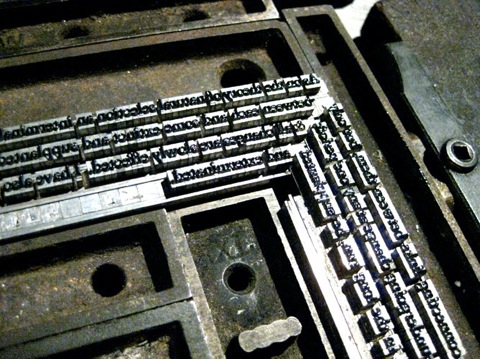
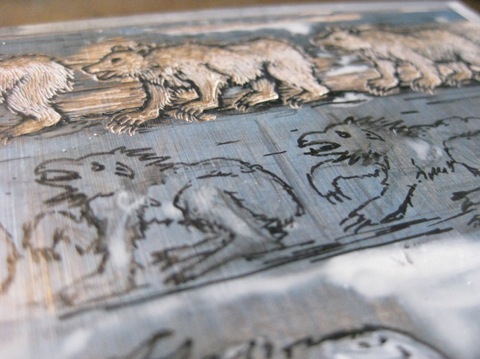
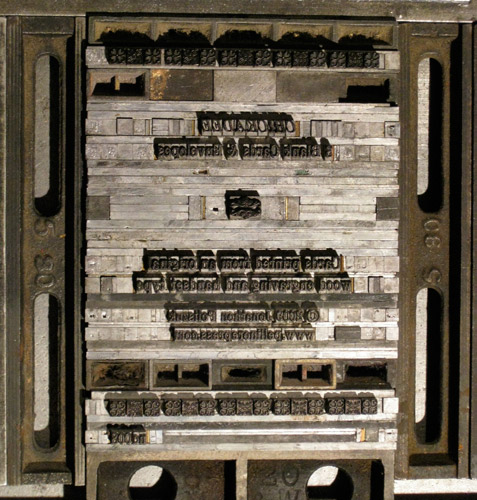
Setting the Type: These shots show the handset type locked up in the bed of the press. I’ll still need to make some spacing adjustments so that the type flows nicely around the corners.
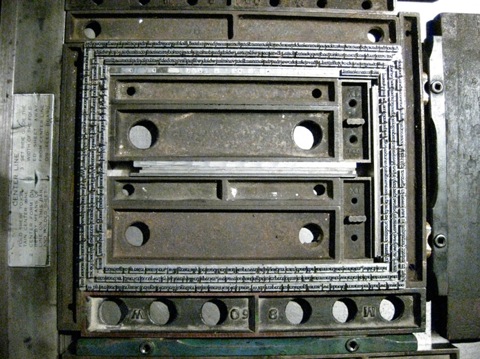
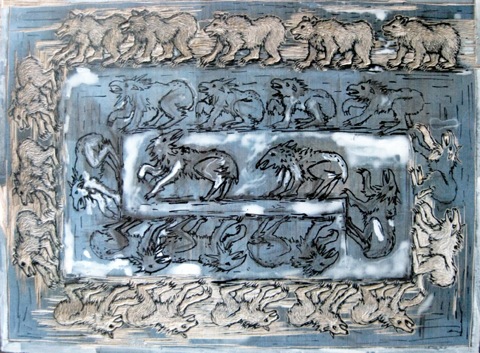
Engraving the Block: Once I finish carving, this large wood engraving will be printed in the center of the type border. The blue areas are where I toned the block to make it easier to see what’s been carved.
Proofreading Challenge
The first 3 people to inform me that they’ve proofread the passages will receive a small prize. The first person to find each mistake (if any) will receive a slightly larger prize.
Thank you!
-Ursula
ursula@pellinorepress.com
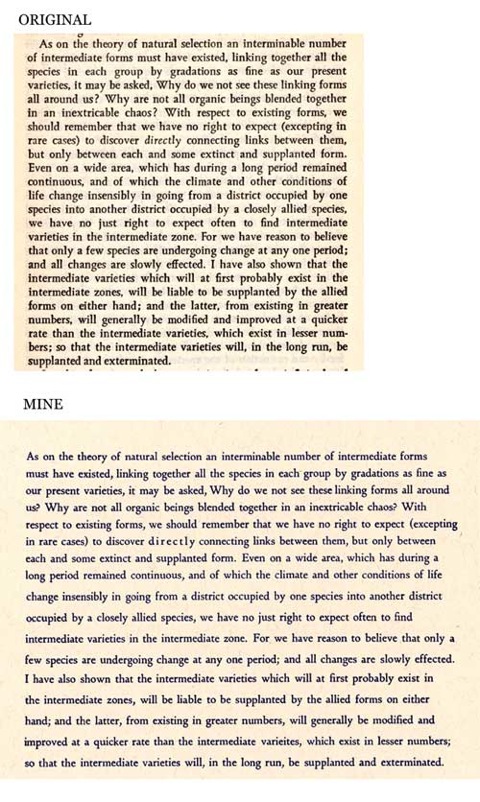
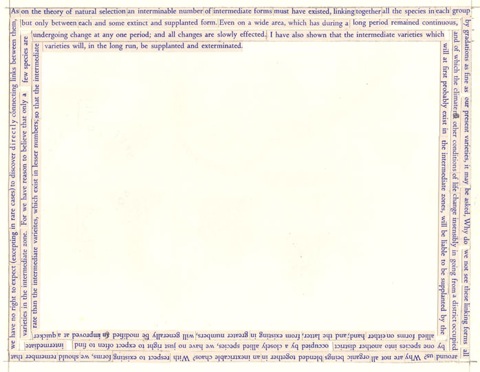
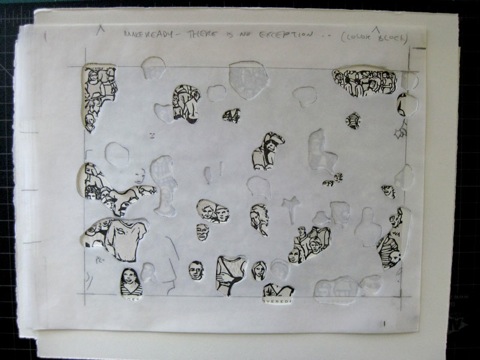
Once I’m sure that I’ve made no mistakes, I will be setting the type in a spiral. It will form the border for a 6x8” wood engraving. Below is a paste-up I’ve made to help figure out line lengths.
After Darwin: The Valve House
The biggest challenge in the printing of this image was the registration, particularly of the black (which is actually a very dark green) with the preceding colors. Partway through I realized that I could have done the entire print as a reduction cut, meaning that the same block is progressively carved and printed, lightest color to darkest. As it is, the pale green/gray and middle green are a reduction. The image below shows the successive layers.
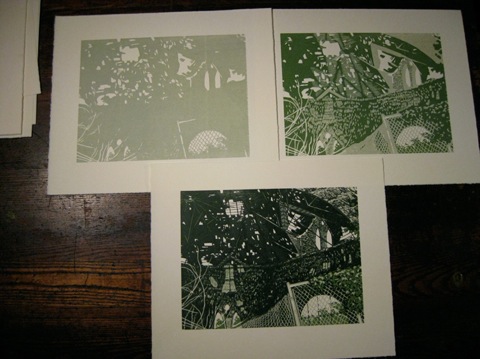
The colors I originally devised were not going to work as a reduction, so I cut a key block and worked from there. One aspect of the present print which would have been impossible as a reduction, is the places where the middle green is cut away and the black sits only on the green/gray, such as in the subtle roof structure discernable in the center of the image. Read More...
After Darwin #3
At this time he was recommended by a teacher at Cambridge for a position on board H.M.S. Beagle, which, under Captain Robert FitzRoy, was to conduct a survey voyage of distant parts as it circled the world. The exact nature of Darwin’s position is debatable, though it includes one or both of the following parts: as geologist, and/or as gentlemen companion to the captain (someone of his social class to share meals with, etc.). The ship already had a naturalist, but he quit after just four months and Darwin took his place.
In The Voyage of the Beagle Darwin is not offering evidence to support a view, but is collecting data, making observations, and sharing anecdotes. Of course, what he observes is quite likely crucial to the subsequent development of his theory of “descent with modification.”
It was difficult for me to decide what to do for this print at first. Certainly, amazing scenes, geologic events, animals, and people are described on nearly every page. But, all that he describes is far away and it seemed ridiculous to use vicarious sources/photographs to draw from. What kept striking me were his experiences. So, whatever I did had to be within my experience. I began to examine the recurrent themes in The Voyage, rather than particular animals or places. Darwin observes and surmises on the way things change with time, particularly on a geologic scale, so I decided to create something from my own experience that reflects the passage of time.
I find it interesting that there is more “nature” in the city of Baltimore than one might assume, and that its incursion is fairly rapid if lots and structures are neglected: overgrown yards, rotting porches, crumbling walls, plants growing from gutters where a little organic material has collected. Although these are conditions of disuse, apathy, or neglect, there is a beauty to them. Perhaps there is something hopeful to seeing the vegetation unfurl from a seemingly hostile environment, or the tendency for time to imbue things with character.
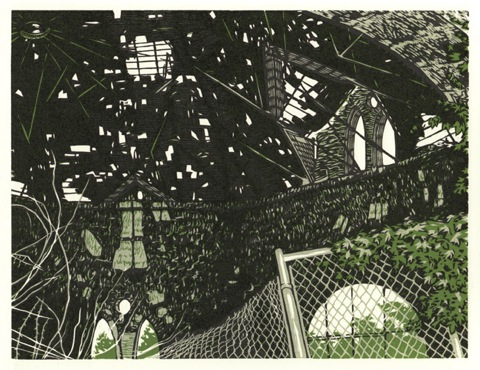
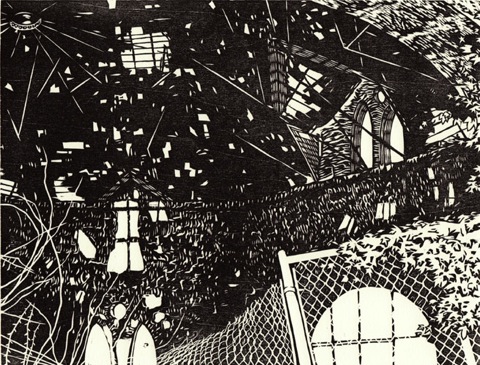
I decided to use the Clifton Park Valve House to represent these ideas. Located on Saint Lo Drive, it was constructed in 1887 to control the flow of water from Lake Montebello, which serviced homes and businesses to the south. An octagonal building with architecture befitting a far grander purpose, the Valve House has seemingly been derelict for many years. A chain link fence, now sagging, and concrete traffic barriers, have been placed around the building, further transforming it.
Initially, I planned to divide the block into three panels to show different aspects of the building, as follows.
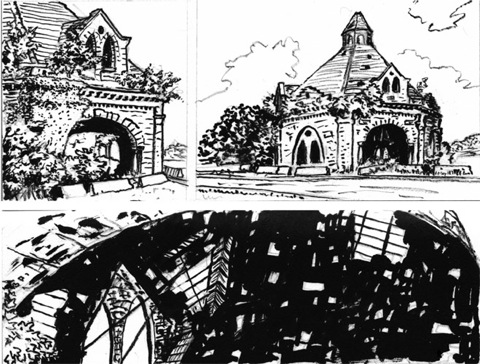
But I decided that I wanted to focus on the more abstract view of the interior, and particularly the crumbling ceiling, which filters light like the canopy of a forest. Here is a proof from the key block, to which I will add a second in reduction cut, to more colors and clarify certain parts.
Read More...
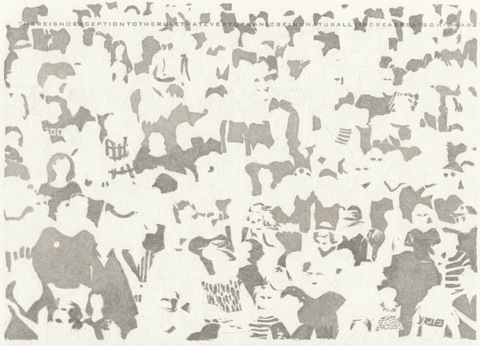
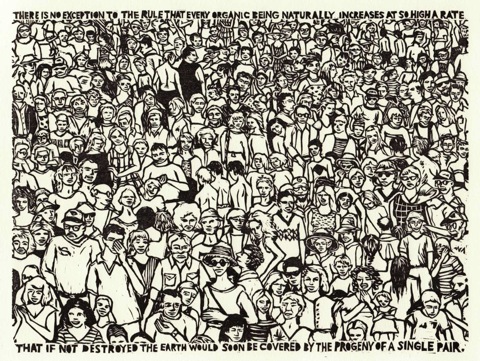
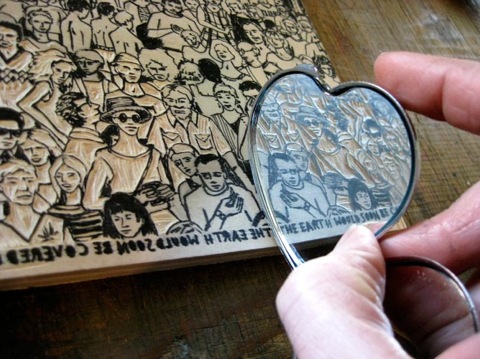
There is No Exception to the Rule: Finished Print
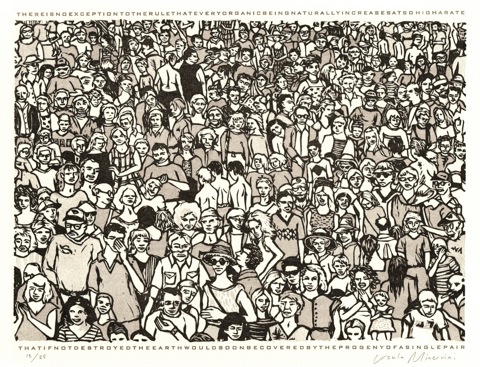
In Chapter Three of The Origin of Species, Darwin writes:
There is no exception to the rule that every organic being naturally increases
at so high a rate, that if not destroyed, the earth would soon be covered by
the progeny of a single pair.
Darwin goes on to describe the relatively short span of time it might take a slow breeding animal like the elephant to become densely populated if every individual survived and reproduced. My first idea for a print was to depict a naturally solitary species, such as the polar bear, so overpopulated as to fill the picture plane with a solid mass of bodies.
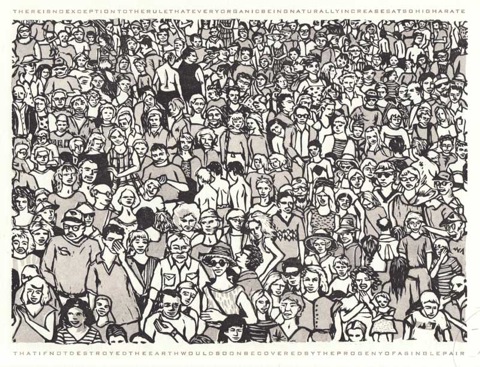
I eventually chose humans as my subject, since we seem to have the best chance of covering the earth with our progeny. (Darwin states that “even slow-breeding man has doubled in twenty-five years.”) Drawing from snapshots taken at the beach, at public events, and at gatherings of family and friends I created a crowd of figures packed onto a seven by nine inch wood block. In some respects the image is playful. Looking over the faces in the crowd might bring to mind the “Where’s Waldo” books. In the process of drawing, carving, and printing the blocks, I developed feelings of affection for this group of figures. But, although the figures may be charming, I would not wish to be part of this crowd.
The quote printed along the edges of the image is intended to balance its lighter and more playful qualities. The text adds a contrasting element to what otherwise could simply be a depiction of people at a county fair or a sporting event. The text is deliberately difficult to read so as not to completely dominate and shape a viewer’s first impression of the image. It is my hope that the print will be appreciated as an object of beauty, as an entertaining diversion, and as a more sober reminder that there are limits to the amount of growth that can or should be sustained.
-Ursula West Minervini
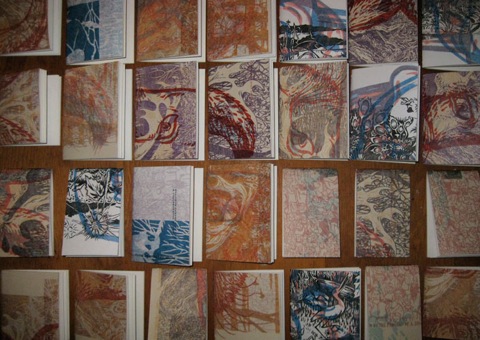
Pocket Books
After printing, the block is stripped by printing onto several sheets of the same or slightly thicker paper to remove excess ink. The same sheet can be used for this purpose for quite some time. In doing so, layers of images are formed. These can be fairly dense prints, if run directly after the last print, or mere ghosts when the block has already been stripped a few times. When they start to get interesting we’ll set them aside to be the covers for the pocket books.
The first step is to coat the covers with PVA Size to make them more durable. Bookcloth is then glued to the insides of the covers, which increases their strength and gives color to the interior of the book. The covers are “nipped” in the book press to ensure even adhesion. The covers will dry flat beneath weight.
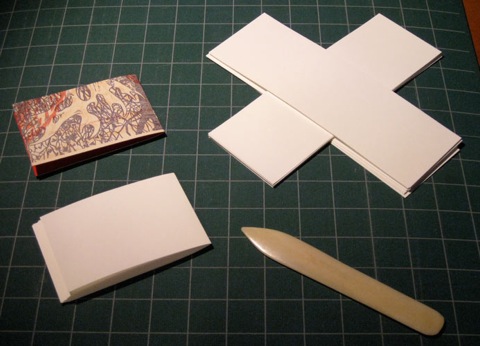
Here a cover awaits trimming to the initial size of the pages.
These pages have been cut to size and arranged in signatures, one for each book. They must be folded individually. A bone folder assists in obtaining clean folds.
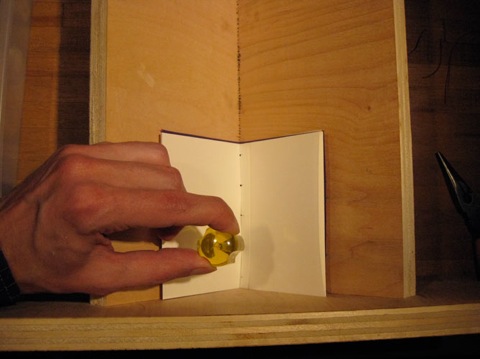
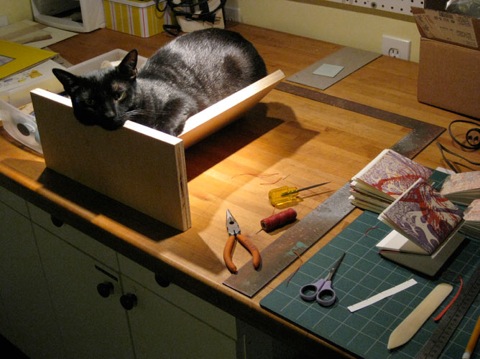
Pages are mated to covers and the sewing stations are pierced using a cradle to help keep everything in place. Below, Queequeg is putting the cradle to a different sort of use.
The books are sewn with colored, waxed thread using a pamphlet stitch of 3 or 5 holes depending on the length of the spine. Finally, the head, tail, and fore edge are each trimmed in the guillotine cutter to ensure clean edges. Here are some finished books!
 Read More...
There is No Exception to the Rule – Adding a Second Block
I also wanted to try a variation on a technique used by Ilse Buchert Nesbitt of The Third and Elm Press. She uses different thicknesses of packing material to print a range of values from a single woodblock. There is a very good explanation of her process here.
Here is a simplified overview of the process I used:
1. I used ink wash on a proof of the key block to determine where I wanted gray, then transferred the image from the key block on to a second block and inked the grey areas. Everything that is not inked was then carved away.
2. Proofing: After carving, the grey block is printed (proofed) alone and with the key block. (You can also see that I later used the same sheet to proof the type) The grey in these proofs is all basically the same value, with some variation due to the fact that I was inking by hand and using a very transparent ink.
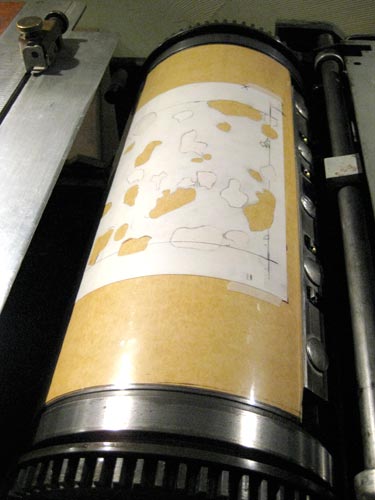
3. Preparing the Packing Material (Makeready): I laid a sheet of tracing paper over my proof and traced the areas where I wanted to adjust the value of the grey. I then assembled a stack of 6 sheets of tracing paper. Using my traced marks as a guide, I cut through all of the sheets where I wanted the lightest values (less impression), and through half the sheets for a middle value (moderate impression). The places where I cut away nothing receive the most impression and print as the darkest value.
Here is the finished packing laid over a completed print. The areas that show through are the palest shades of grey in the final image because they receive the least impression when printing.
4. Printing the Grey Block: These images show the grey block locked up in the press bed and the packing material positioned on the impression cylinder.
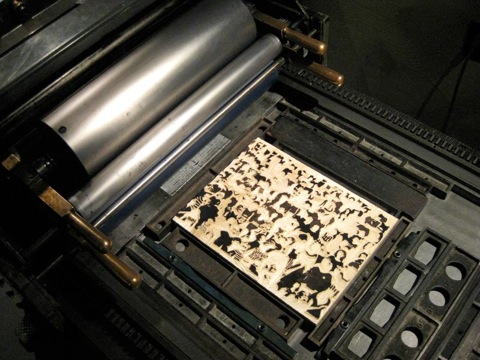
5. Once the grey block was printing consistently, I printed about 50 sheets. In the following days I added the key block and then the type. Each required separate inking and makeready. Accounting for losses due to registration problems and printing inconsistencies, this was just enough to give me a final edition of 25 prints.
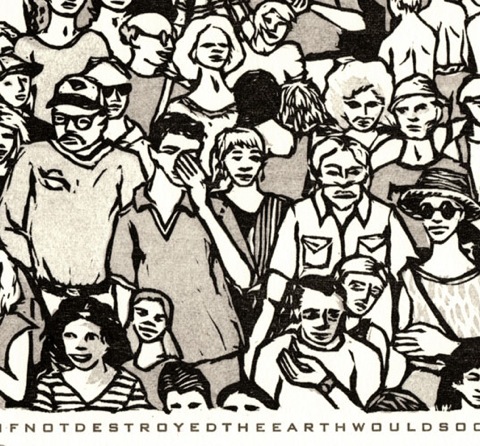
Though it’s a bit difficult to pick up in a scan, this detail from the final image shows the subtle range of values in the grey block. Compare the shirts on the man with the cap and glasses (no packing) and the man with his hand over his face (full 6 sheets of packing)
Read More...
After Darwin: No Exception to the Rule
After Darwin: No Exception to the Rule
I was inspired by a line from The Origin of Species which reads:
“There is no exception to the rule that every organic being naturally increases at so high a rate, that if not destroyed, the earth would soon be covered by the progeny of a single pair.”
My initial reaction to the text was to think of large groups of animals. I considered depicting normally solitary creatures like polar bears packed into a large mass to illustrate the idea that any creature, if unchecked, can quickly saturate its environment. I eventually decided to create a print with humanity as its subject. In the past year I’ve been looking at James Ensor. Ensor’s prints and drawings of crowd scenes were a definite influence.
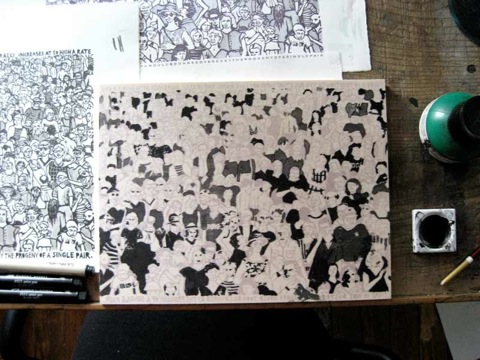
This first image shows the early stages of the drawing. I work in pencil first, then ink the lines. You can see some of my reference photos in this shot as well.
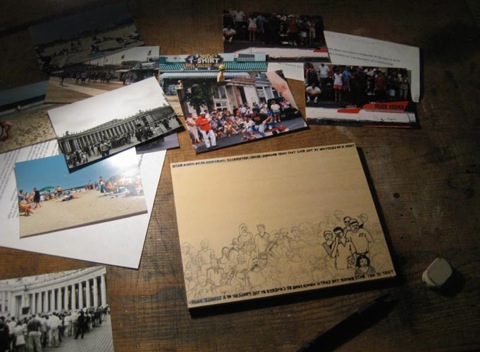
Here the drawing is about half finished. It became more challenging as the work went on to fill the space with ever smaller figures.
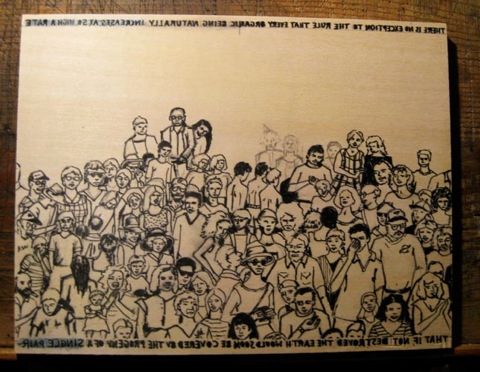
At last the drawing is finished!
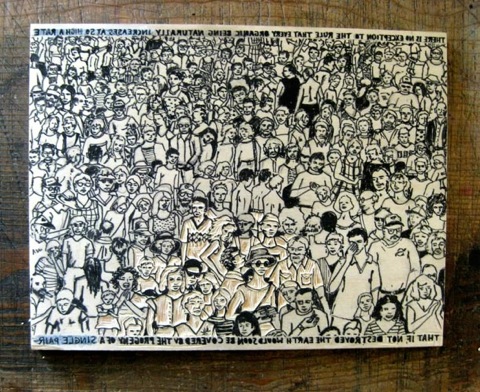
I decided that the print should include the text, which must be written and carved backwards in order to be right-reading when the block is printed. I used a mirror to double and triple-check that I’d transcribed the text correctly.
-Ursula Minervini, 3/2/2011
After Darwin: An Organ Injurious
Here I am printing the orange block. The print above the stack of finished prints is the first print I was satisfied with (density of color, color choice, amount of ink etc.). I keep it there to refer to as I print to maintain consistency. If you look closely, you will see some earlier color trial proofs in the background.
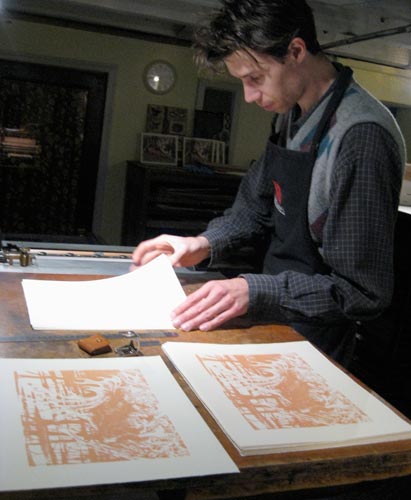
The key block proved more difficult, primarily due to inconsistencies in the block’s thickness. Learning from the color problems printing the orange, I mixed the purplish black darker than my swatch. I judged correctly and the color was not problematic, though getting the block to print evenly was. I had a frustrating enough time that I didn’t bother taking any pictures, but I’m pleased with the final results. The finished prints will be signed and shipped out to our print subscribers this week in order to arrive in time for Christmas.
 Read More...
After Darwin: An Organ Injurious
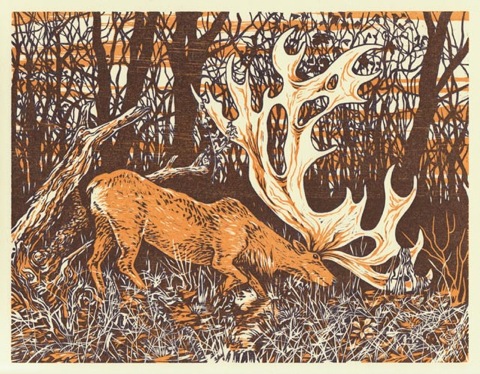
Part of what attracts me to On the Origin of Species is that, despite Darwin’s cohesive, developed idea of natural selection, scientific fields which would supply some of the missing pieces, such as genetics, were nascent at best. As such, there is a sense of the explorer as author about the work, complete with wonder, epiphanies, and stumbles. Darwin struggled to find a catalyst for the variation of traits that would be inherited based on the mechanism of natural selection. In the chapter on Laws of Variation, Darwin cites use and disuse as probable catalysts. He says, speaking of beetles inhabiting the island of Madeira:
For during thousands of successive generations each individual beetle which flew least, either from its wings being ever so little less perfectly developed or from indolent habit, will have had the best chance of surviving from not being blown out to sea; and, on the other hand, those beetles which most readily took to flight will oftenest have been blown to sea and thus have been destroyed.
Darwin later states:
Again, an organ useful under certain conditions, might become injurious under others, as with the wings of beetles living on small and exposed islands; and in this case natural selection would slowly continue to reduce the organ, until it was rendered harmless and rudimentary.
This led me to think of the antlers of deer, employed by males of many species as an attraction to females. At what point is the size of the antlers inimical rather than beneficial? It was once believed that the Irish Elk (more accurately Giant Deer) became extinct due to the large size of its antlers.
Here is a proof of the first of two blocks which will compose this print. This is not the final color.
 Read More...
Gradation woodcut 2nd color
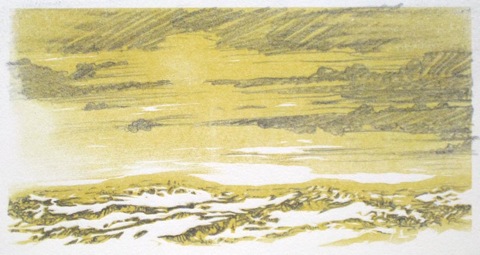
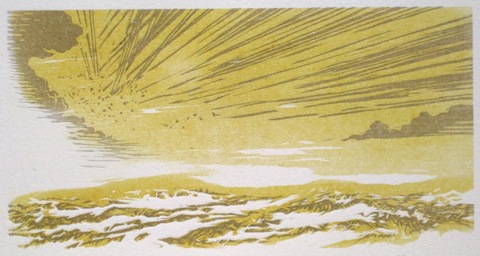
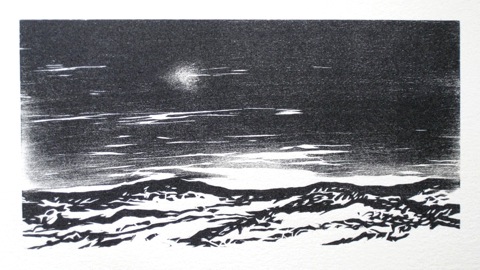
Searching for something a little livelier, I started reading some dreams I had recorded. One contained a vast landscape into which were plummeting meteorites that turned out to be small metal shapes reminiscent of insects. I had also been reminded recently of the impact/explosion of a meteorite in 1908 in Tunguska, Russia (check it out, pretty interesting). Here is the sketch for the sky inspired by the dream and the event in 1908.
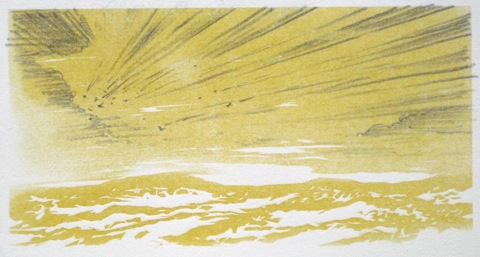
This is the final print. I’m overall pleased considering it began as an experiment. Note that because most of this is linear, it prints much more consistently even though it is the same sanded block as the initial yellow printing. The sky is still a little paler than the foreground and I retained the handling of the landscape from the first sketch. It’s titled The Event.
Read More...
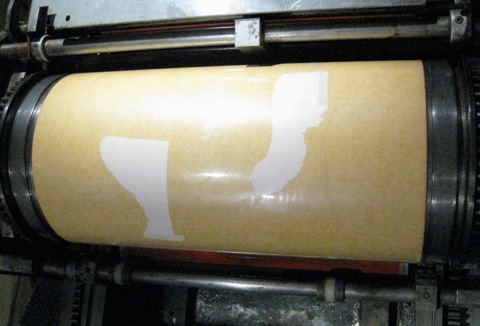
Printing Inversion No. 3
Often these are large flat areas of color that require more impression because the force is more distributed. But, printing problems may also result from inconsistencies in the block itself. If there is a corner or edge of the block that is obviously low, pieces of newsprint or tracing paper carefully placed beneath these areas will help. For more precise results, packing the cylinder is necessary. Running a proof with a backing sheet of newsprint (thin), or tracing paper (very thin) can help determine how much packing is necessary. When this is established, the proof is marked and the paper to be used for packing is torn or cut to shape, but with a tail or edge available to tape to the tympan cover. Before mylar tympans, a system of pinholes was used to place the packing beneath the top sheet.
Here is the proof marked with pencil for light spots.
Printing directly on the mylar tympan is an easy way to see exactly where the packing needs to be placed. With the tympan loosened the packing can be taped to the underside of the tympan. I should have gotten a shot of this, but only have it completed.
I’ll be uploading images of the completed poster soon.
Read More...
Gradation Woodcut
Since the tonality is in the block itself, printing the tone should be repeatable enough to create an edition, given a press with small tolerances and careful monitoring of the ink. With its adjustable bed, the 15-21 allows for very slight changes in impression without having to make underlays or overlays and worked well to fine tune the tone while maintaining some blacks.
Here is the proof from the block after carving, but without any sanding.
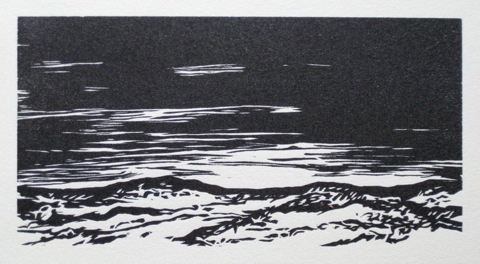
This is after several timid rounds of sanding and proofing, stripping the block, sanding and proofing… Many small details, the shallower cuts in the wood, disappear the more the block is sanded.
There were some interesting things happening, but it wasn’t there yet. My monotypes were in color, which gave them a softer feel, so I tried printing the landscape in a muted hue. I think at this stage I might still prefer the unsanded proof, but I want to take it to its conclusion.
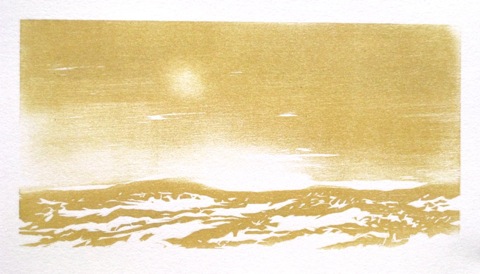
I think it needs a second color, so I’m going to continue with it as a reduction cut. Read More...
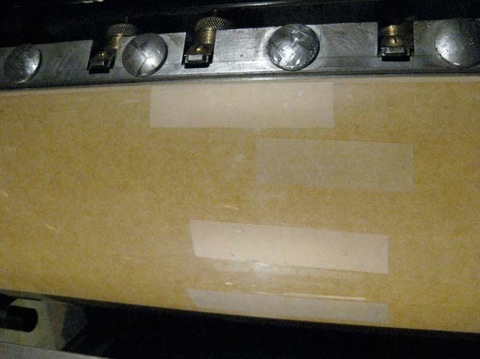
Printing business cards
Printing our one color business cards is pretty straightforward. One thing of note is a sort of shortcut packing we discovered. Basically it consists of placing pieces of Scotch tape on the mylar tympan cover to act as packing. The advantage is that it doesn’t require loosening the tympan to place packing beneath, which can often be a rather fiddly job. The disadvantage is that it cannot be used for broad areas or the tape will leave an impression of its edges on the back of the paper. Therefore, it’s mostly useful for lines of type and not woodcuts or the like. This is a shot of the tape on the cylinder, here used for the larger, heavier type, as well as the Torino address lines, which is strange because that font is so fine; it might be a slight manufacturing difference in height, or perhaps the type is worn.
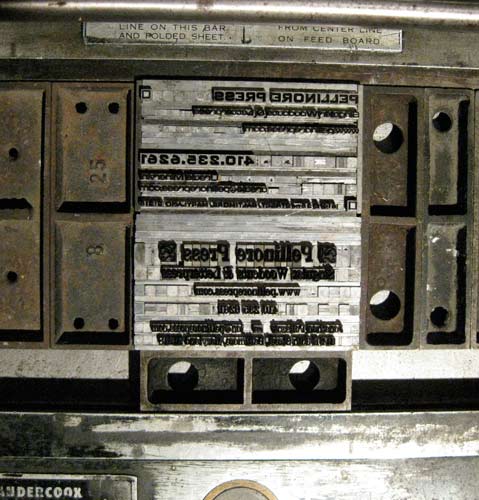
A shot of the form locked-up and inked.
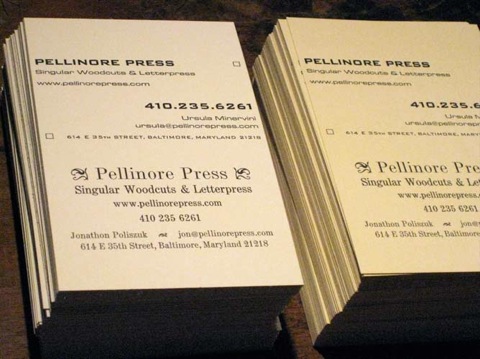
Here are the cards before trimming. We printed on offcuts, thus the 2 different paper colors.
 Read More...
Printing Inversion No. 2
Printing the mini poster Inversion No. 2
The second in a series, this two color mini poster consists of two woodcuts and handset type, requiring three runs. The pink woodcut has such large solid areas that we double print them, meaning run each of them twice in a row. This puts down more ink than several inkings on Trip. This may be derided by purists, but it works due to the Vandercook’s exact registration system; the product is a poster after all, selling for far less than an editioned print. The blue block with its thinner lines needs only some cylinder packing and a few inkings on Trip.
Pink.
Blue. It’s necessary to clear/carve the negative space very thoroughly on this block for a clean print.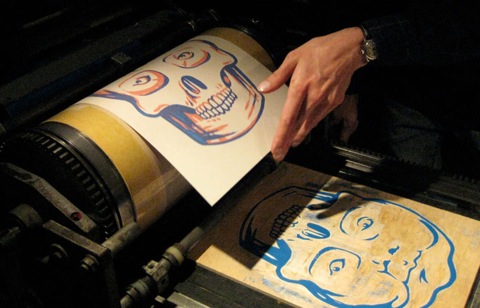
Here is a good proof and some lighter proofs which were also used to strip the block after printing. The type has not been printed yet. In this image one can see the way the poster can be viewed in either orientation.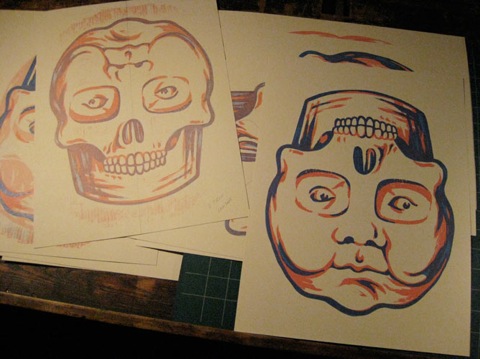
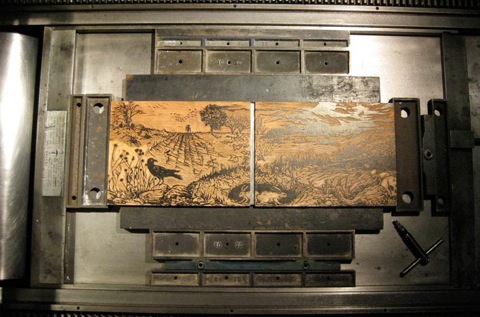
Printing exquisite landscapes
The following image shows the blocks locked up in the press bed. Astute observers will notice the absence of the distribution and form rollers, as well as the lack of ink on the drum. We ink these by brayer because they require so many thin layers of ink and specific amounts of ink in different areas due to inconsistencies in the blocks. These blocks were cupped pretty badly, which required newsprint underlays to build up the edges, otherwise they would rock and the rest of the printing preparation was impossible.
This image shows target inking with a small brayer.
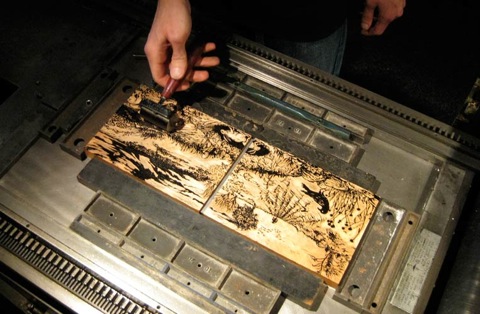
Here is the print being pulled. Just visible beneath the right side of the print is the edge of the elaborate cylinder packing required due to the cupped blocks.
Read More...
Notecard Inserts
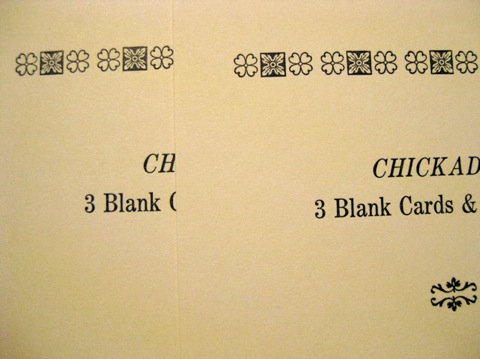
The following are 2 proofs showing the clogged and subsequently cleaned serif on the “a” in “Blank”. Usually the brush is sufficient to remove gunk that collects in the crevices of counters and serifs, but this required the careful use of an Exacto knife. The font is Century Nova, and luckily we have a lot of it.
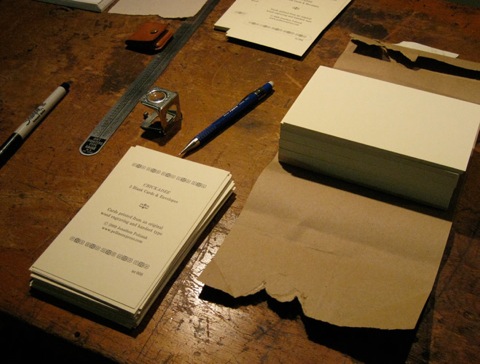
Here is the growing stack of finished inserts and some tools, such as a ruler with typographic measurements and a loupe for examining proofs. This ruler is especially nice as it has points as well as picas.
Read More...